The Connections!
Finally, started to connect together whatever I had bought.
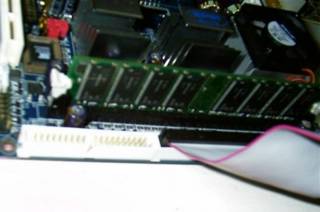
First, the RAM went in. This is pretty straightforward, as there is a small notch on the RAM which aligns with the RAM socket.
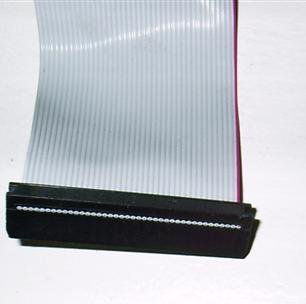
Next was the Hard Disk Drive. One of the interesting things that I learnt was that IDE cables has one edge which is coloured red, which I hadn’t noticed. This edge goes into that side which of the IDE socket which says ‘Pin 1’. (I didn’t know this either!) This is to ensure that the correct wires get connected to the correct pins.
The ‘Pin 1’ of the hard drive is also marked.
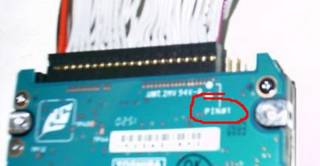
As is the ‘Pin 1’ of the IDE socket on the motherboard. I realized that this is marked on the underside of the motherboard and not on the side of the socket!
So this is how it looks once connected.
And then the CD / DVD ROM drive. I kept wondering where to connect this, especially since there was a socket on the motherboard which said CD-in. Apparently, this is for something else (to be figured out later, if required!). Finally, after doing some googling, realized that it goes into the second IDE drive socket! That is the one next to where the HDD connects onto the motherboard in the picture above. Another notable point here is that the two IDE connectors on the motherboard are 'Primary' and 'Secondary'. So, if there is only one connection it should go into the 'Primary' IDE connector.
The same idea with the ‘Pin 1’ applies here too!
Besides, the IDE cable, one of the power connectors from the PSU also connects into the CD ROM / DVD drive. Here's how it looks almost connected. I'm just going to be pusing the IDE connector in!
.jpg)
Since this is also a slimline optical drive, I had to connect the laptop IDE drive connector. Just like the HDD, the ‘Pin 1’ of the optical drive is also marked.
.jpg)
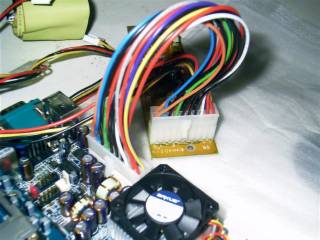
Next, came the power supply unit. This connects to the motherboard with the included cable. It took some time to figure out which end of the power cable goes into the PSU and which end into the motherboard. But I figured logically that there would be more connections from the PSU side of things to power the rest of the computer, so that worked!
First, the RAM went in. This is pretty straightforward, as there is a small notch on the RAM which aligns with the RAM socket.
Next was the Hard Disk Drive. One of the interesting things that I learnt was that IDE cables has one edge which is coloured red, which I hadn’t noticed. This edge goes into that side which of the IDE socket which says ‘Pin 1’. (I didn’t know this either!) This is to ensure that the correct wires get connected to the correct pins.
The ‘Pin 1’ of the hard drive is also marked.
As is the ‘Pin 1’ of the IDE socket on the motherboard. I realized that this is marked on the underside of the motherboard and not on the side of the socket!
So this is how it looks once connected.
And then the CD / DVD ROM drive. I kept wondering where to connect this, especially since there was a socket on the motherboard which said CD-in. Apparently, this is for something else (to be figured out later, if required!). Finally, after doing some googling, realized that it goes into the second IDE drive socket! That is the one next to where the HDD connects onto the motherboard in the picture above. Another notable point here is that the two IDE connectors on the motherboard are 'Primary' and 'Secondary'. So, if there is only one connection it should go into the 'Primary' IDE connector.
The same idea with the ‘Pin 1’ applies here too!
Besides, the IDE cable, one of the power connectors from the PSU also connects into the CD ROM / DVD drive. Here's how it looks almost connected. I'm just going to be pusing the IDE connector in!
Since this is also a slimline optical drive, I had to connect the laptop IDE drive connector. Just like the HDD, the ‘Pin 1’ of the optical drive is also marked.
Next, came the power supply unit. This connects to the motherboard with the included cable. It took some time to figure out which end of the power cable goes into the PSU and which end into the motherboard. But I figured logically that there would be more connections from the PSU side of things to power the rest of the computer, so that worked!
posted by abhijit at
7:58 PM
![]()


0 Comments:
Post a Comment
<< Home